
How to Flash Samsung Galaxy Z2 PRICE SM-Z200F using Odin with ease - Before we start our tutorial on using Samsung Odin and installing a Samsung firmware update,I’d like to take a moment and talk to you about phone unlocking. If you’re already rooting your device and looking into installing the new firmware, consider unlocking your device first – once your phone’s rooted, it cannot be unlocked. So it’s the best time to do it, it time takes minutes. Check out our phone unlocking service now.

IMPORTANT! Installing Samsung firmware using Odin software is not the official way to do it.This method is used only if you want to unroot or reinstall an official firmware in case you’re using a Custom ROM. Odin can also be used if you want to install another country’s firmware on your device. You should always be careful that the firmware you have flashed is for your model precisely. We cannot be held responsible for any damage that your device might incur, please proceed at your own risk. If you need help on how to use Odin or a second opinion, check out the Update forum first.Is your Samsung phone shutting off unexpectedly, crashing apps, or acting buggy? If you want to fix these problems, it may be time for a Samsung firmware update. Just like getting an oil change or tire rotation, updating the firmware on your phone can help it run smoothly and more efficiently.However, the biggest problem with OTA updates for Android devices, in general, is that they are incremental, which means that not all devices receive the update right away. Even if you have the latest Galaxy S8 in your possession, your region and network carrier determine when you receive the next awesome Samsung firmware update.
Since most of us don’t have the patience needed to receive the standard OTA update, there is a way to get past the waiting line with Samsung Odin. By using Update Firmware Platform as your source of verified Samsung firmware download and Odin software to flash it, you can always stay ahead of the curve when it comes to keeping your phone up to date.Let’s take a look at how you can use Odin to update your Samsung firmware or repair smartphone.
Odin is a firmware flashing software developed and internally used by Samsung.It is believed that instead of released by Samsung officially, the tool is leaked accidently. And thanks to the leak, this effective tool is now widely used by Samsung users to flash firmware, recoveries, bootloader, or modem files on Samsung Galaxy device. This tutorial is going to show you the process of flashing Samsung stock/official ROM via Odin.
Step 2: Download (Stock ROM compatible with your device or if you have already downloaded the firmware then ignore downloading it again) and extract it on your computer. After extracting you will be to see kind of files "MD5".
Step 3: Power Off your Samsung Device.
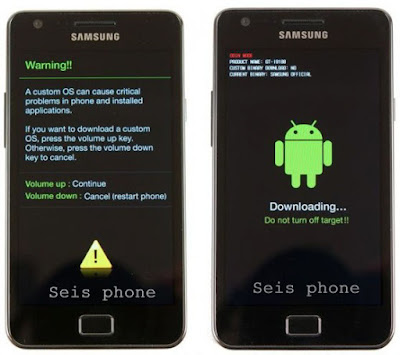
Step 4: Now, you have to boot into "Download mode". To boot into Download Mode: Press and Hold "Volume Down" Key "Home" Key and "Power Key". When phone vibrates Leave the Power Key but Keep holding the "Volume Down" Key and "Home" key. You will boot into the "Download Mode".

Step 5: In the Download mode you will be able to see a Warning Yellow Triangle Sign. In this situation you have to press the "Volume up" key to "continue".
Step 6: Download and extract Odin on your computer. After extracting you will be able to see the following files Odin.exe and Click "instal Odin.exe":
Step 7: Now, Open Odin3 and connect your phone to the computer.
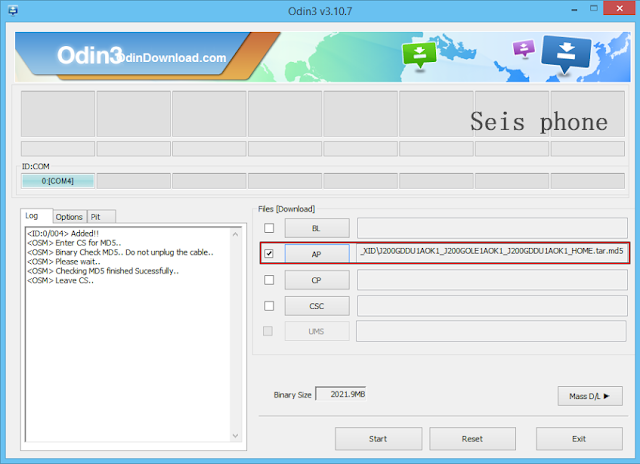
Step 8: Once you have connected the phone to the computer, Odin will automatically recognize the device and show “Added” message at the lower-left panel.

Step 9: Once your device detected by Odin, click on the “PDA” button and select the "tar.md5" file that you have extracted in Step #2.
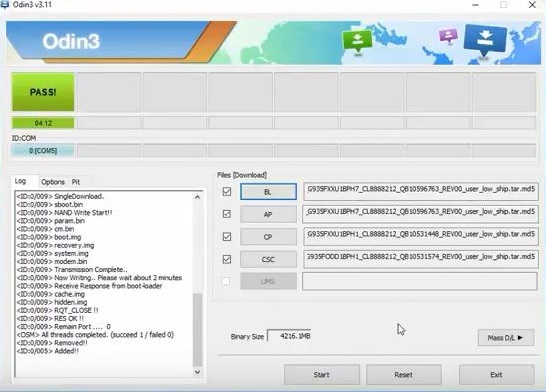
Step 10: Now, click on the “Start” button in Odin to begin the Flashing process.
Step 11: Once you see, the "Green" Pass Message then remove the USB cable from the device (during this process, your device will restart automatically)
Step 13: In Recovery Mode, Click "Wipe Data/factory reset".

Step 14: Once Cache Data is cleared, Select Restart Phone Now from the recovery menu.
Readme Once:
[*] Data Loss Process: Flashing Stock ROM is always a data loss procedure. So, always take backup of your personal data before flashing the Stock ROM.
[*] Flashing Stock ROM or Downgrading Stock ROM does not void your Phone warranty. So, dont worry about the device warranty.
[*] Samsung Stock Firmware: If you are looking for the original firmware for your device then head over to Download Samsung Stock Firmware for all devices page.
[*] Samsung USB Driver: If you are looking for the original USB Driver for your device then head over to Download Samsung USB Driver for all devices page.

IMPORTANT! Installing Samsung firmware using Odin software is not the official way to do it.This method is used only if you want to unroot or reinstall an official firmware in case you’re using a Custom ROM. Odin can also be used if you want to install another country’s firmware on your device. You should always be careful that the firmware you have flashed is for your model precisely. We cannot be held responsible for any damage that your device might incur, please proceed at your own risk. If you need help on how to use Odin or a second opinion, check out the Update forum first.Is your Samsung phone shutting off unexpectedly, crashing apps, or acting buggy? If you want to fix these problems, it may be time for a Samsung firmware update. Just like getting an oil change or tire rotation, updating the firmware on your phone can help it run smoothly and more efficiently.However, the biggest problem with OTA updates for Android devices, in general, is that they are incremental, which means that not all devices receive the update right away. Even if you have the latest Galaxy S8 in your possession, your region and network carrier determine when you receive the next awesome Samsung firmware update.
Since most of us don’t have the patience needed to receive the standard OTA update, there is a way to get past the waiting line with Samsung Odin. By using Update Firmware Platform as your source of verified Samsung firmware download and Odin software to flash it, you can always stay ahead of the curve when it comes to keeping your phone up to date.Let’s take a look at how you can use Odin to update your Samsung firmware or repair smartphone.
Odin is a firmware flashing software developed and internally used by Samsung.It is believed that instead of released by Samsung officially, the tool is leaked accidently. And thanks to the leak, this effective tool is now widely used by Samsung users to flash firmware, recoveries, bootloader, or modem files on Samsung Galaxy device. This tutorial is going to show you the process of flashing Samsung stock/official ROM via Odin.
Process Flashing :
Step 1: Download and install Samsung USB Driver or Download and instal Samsung kies on your computer.( if case you have already installed the Samsung USB Driver on your computer then Skip this step).
Step 2: Download (Stock ROM compatible with your device or if you have already downloaded the firmware then ignore downloading it again) and extract it on your computer. After extracting you will be to see kind of files "MD5".
Step 3: Power Off your Samsung Device.
Step 4: Now, you have to boot into "Download mode". To boot into Download Mode: Press and Hold "Volume Down" Key "Home" Key and "Power Key". When phone vibrates Leave the Power Key but Keep holding the "Volume Down" Key and "Home" key. You will boot into the "Download Mode".
Step 5: In the Download mode you will be able to see a Warning Yellow Triangle Sign. In this situation you have to press the "Volume up" key to "continue".
Step 6: Download and extract Odin on your computer. After extracting you will be able to see the following files Odin.exe and Click "instal Odin.exe":
Step 7: Now, Open Odin3 and connect your phone to the computer.
Step 8: Once you have connected the phone to the computer, Odin will automatically recognize the device and show “Added” message at the lower-left panel.
Step 9: Once your device detected by Odin, click on the “PDA” button and select the "tar.md5" file that you have extracted in Step #2.
Step 10: Now, click on the “Start” button in Odin to begin the Flashing process.
Step 11: Once you see, the "Green" Pass Message then remove the USB cable from the device (during this process, your device will restart automatically)
Step 12: Your Samsung Device will now stuck at boot (boot loop). Now and, You have to boot into Stock Recovery Mode, To Enable Stock"Recovery mode":Press and Hold "Volume UP" key"Home" Key, "Power" Key. When phone vibrates Leave the "Power "Key but Keep holding the "Volume UP" Key and "Home" key. You will boot into the Recovery Mode.
Step 13: In Recovery Mode, Click "Wipe Data/factory reset".
Step 14: Once Cache Data is cleared, Select Restart Phone Now from the recovery menu.
Readme Once:
[*] Data Loss Process: Flashing Stock ROM is always a data loss procedure. So, always take backup of your personal data before flashing the Stock ROM.
[*] Flashing Stock ROM or Downgrading Stock ROM does not void your Phone warranty. So, dont worry about the device warranty.
[*] Samsung Stock Firmware: If you are looking for the original firmware for your device then head over to Download Samsung Stock Firmware for all devices page.
[*] Samsung USB Driver: If you are looking for the original USB Driver for your device then head over to Download Samsung USB Driver for all devices page.
Flashing stock ROM can do us many favors: fix system crash, unstable apps, device stuck at logo, bring the device back to unrooted statue And there are more reasons you may want to flash ROM of an Android phone.thanks you